Hugo, bulam, rellax, animate.css を netlify + netlify cms でホスティングしたランディングページを作成する(実装編)
はじめに
前回の準備編に引き続き、Hugo , bulam , rellax , animate.css でランディングページを実装していきます。
実際のページはこちら

実装
さっそく実装していきたいところではありますが、 Hugo はとても決まりごとが多く出だしでつまずく方が多いのではないでしょうか。
まずは基礎が学べて、私もとてもお世話になった2つのサイトを紹介させていただきます。
参考サイト
1つ目は ゴリラでも分かる静的サイトジェネレーターHugoでオリジナルテーマ作り 様です。
何が素晴らしいかというと Hugo をインストールして自身で書いた Theme のテンプレートが動きます。
Hugo はかっこいい Theme からテーマを持ってきて動かして満足してしまいがちですが、このサイト様では記事とそのリストを0から作成し、動かすことができます。
2つ目はまくまくHugo/Goノート様の レイアウト用のテンプレートの種類を理解する です。
Hugo で Theme を作成するときに必ず混乱するのが、どの html ファイル(テンプレート)が、どの階層も markdown ファイルに適用されるかについてです。
これについては Web の知識でも go 言語の template パッケージの仕様でもなんでなく Hugo の仕様を覚えるだけです。
以下のページに大別して ホームページ セクション リスト シングル の4種類の階層が存在していて、それぞれ適用されるテンプレートの優先順位がまとまっています。
Hugo レイアウト
今回は全て index.html にロジックを集めます。
そもそもページ遷移しないので、現時点での私の知識ではセクションごとのテンプレートを作成するのは少しオーバースペックと考えました。
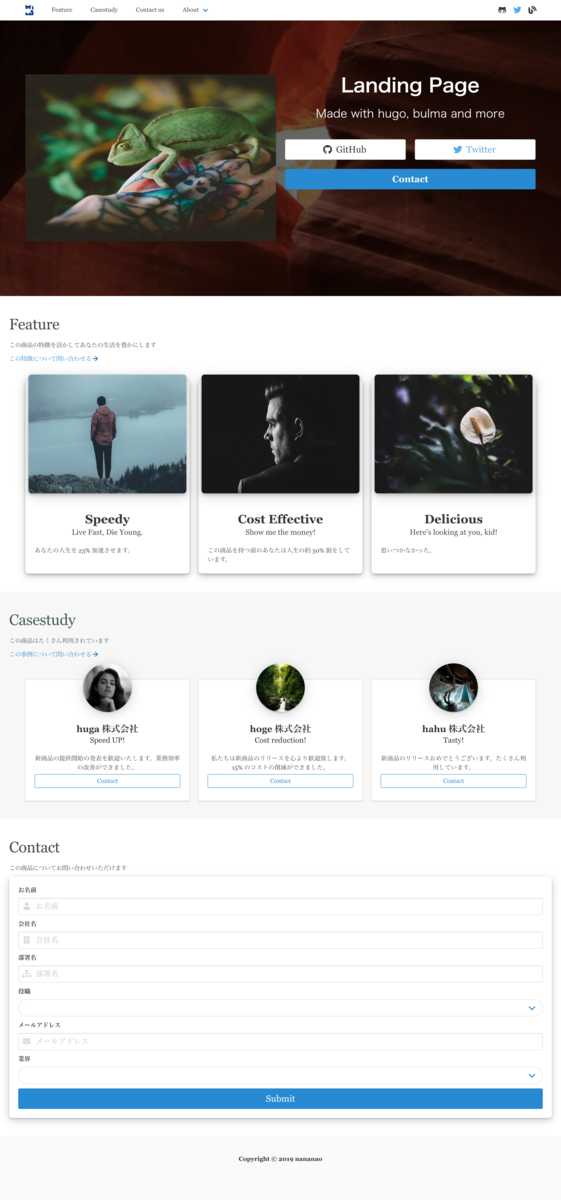
動いているページ を見ていただければわかりますが大きく6段の section に分けています。
- header:ロゴや各セクション、SNSへのリンクを載せています。Responsive になっておりスマホでは畳まれて表示されます。
- top section:一番アピールしたい写真とメッセージ、コンバージョンポイントである Form へのリンクを載せています。
- feature section:機能について説明しています。あくまでデモなので内容は悪しからず。
- casestudy section:事例について説明しています。あくまでデモなので内容は悪しからず。
- form section:netlify Forms を利用して Form を載せています。最低限の Validation を実装します。
- footer:コピーライトやプライバシーポリシーを載せています。
このうち top section, feature section, casestudy section については netlify cms から文章と画像の編集ができるようにします。
.
├── README.md
├── archetypes
├── config.toml
├── content
│   ├── casestudys
│   │   ├── _index.md
│   │   ├── hahu.md
│   │   ├── hoge.md
│   │   └── huga.md
│   ├── features
│   │   ├── _index.md
│   │   ├── cheep.md
│   │   ├── delicious.md
│   │   └── speed.md
│   └── tops
│       ├── _index.md
│       └── main.md
├── data
├── layouts
├── resources
├── static
└── themes
header
header はほぼ bulma の example 通りです。
bulma は標準で Responsive になっていて素晴らしいです。
ロゴや favicon については hatchful という shopify が提供している ツールを利用しました。
準備編にも書きましたが navbar の click イベントに伴う menu の開閉は以下のような javascript を書いています。
document.addEventListener('DOMContentLoaded', () => {
  const $navbarBurgers = Array.prototype.slice.call(document.querySelectorAll('.navbar-burger'), 0);
  if ($navbarBurgers.length > 0) {
    $navbarBurgers.forEach( el => {
      el.addEventListener('click', () => {
        const target = el.dataset.target;
        const $target = document.getElementById(target);
        el.classList.toggle('is-active');
        $target.classList.toggle('is-active');

      });
    });
  }
});
bulma 標準の primary color が少しまぶしかったので assets/bulma-custom.scss を作成し、以下のように primary color を上書きしています。
@import "./sass/utilities/initial-variables";
@import "./sass/utilities/functions";

$blue: #268bd2;
$blue-invert: #fff;

$primary: $blue;
$primary-invert: $blue-invert;

@import "./bulma";
新しい scss ファイルを作成した時には忘れずに head.html から読み込みましょう。
  {{ $styles := resources.Get "bulma-custom.scss" | resources.ToCSS | resources.Minify | resources.Fingerprint }}
  <link rel="stylesheet" href="{{ $styles.RelPermalink }}">
top section
top section は背景画像、商品画像、タイトル、リンクで構成しています。
Hugo layout
今回の構成では/layouts/index.htmlから topsセクション配下の markdown ファイルを参照しに行っています。
あるセクションの layout ファイルから 別のセクションの markdown ファイルを読みにいっています。ここはあまり記事がなかったので少し時間がかかってしまいました。
(ベストプラクティスではないからかもしれません)
以下のように range where .Site.Pages "Section" "tops" と書くことで任意のセクション(今回はtopsセクション)配下のページを range で持ってきています。
配下のページの title, subtitle, description を表示しています。
{{ range where .Site.Pages "Section" "tops" }}
  {{ range first 1 (.Pages.ByWeight) }}

    <h1 class="title intro-title top-title">{{ .Title }}</h1>
    <p class="subtitle has-text-centered top-subtitle">{{ .Params.subtitle }}</p>
    <div class="content">
      <p>{{ .Params.description }}</p>
    </div>

  {{ end }}
{{ end }}
ではtopsセクション配下の markdown ファイルはどうなっているかというと以下のように markdown のヘッダのみにしています。(Hugo でいう Front Matter のみ)
Front Matter は netlify cms から編集できるます。
上記の layout ファイルを見るとわかるように weight が高い(数字が小さい)ものから 1ファイル分だけ読み込むので、内容の入れ替えも簡単にできそうです。
---
title: Landing Page
subtitle: Made with hugo, bulma and more
description:
image: https://source.unsplash.com/random/1280x960?nature
type: tops
weight: 1
draft: false
---
style
top section では画像に透過した filter を被せるころで商品画像、タイトルを見やすくしています。
背景画像は section に対して以下のように指定しています。
.top-section {
  background-image: url("https://source.unsplash.com/random/1920x960?nature");
  background-repeat: no-repeat;
  background-size: cover;
  position: relative;
}
これだけだと商品画像、タイトルが目立たないため以下のようにして背景に黒いフィルターを当てています。
.top-section {
  ~~
  &:before {
    content: '';
    position: absolute;
    top: 0;
    right: 0;
    left: 0;
    bottom: 0;
    background-color: rgba(0,0,0,0.6);
  }
}
定量的な効果は不明ですが、以下のように指定することで、 scroll しても背景画像を sticky にし、目立たせたいその他要素だけが動いているように見せることができます。
.top-section {
  ~~
  width: 100%;
  background-size: cover;
  background-position: center center;
  background-repeat: no-repeat;
  background-attachment: fixed;
  ~~
}
こちらも定量的な効果は不明ですが、目立たせたい商品画像、タイトルに対して class="rellax" data-rellax-speed="-1" を指定して、scroll に対しての進行を遅くしています。
data-rellax-speed="-1" だとあまり体感できませんが、値を大きくしてしまうと次の section と重なりが生じてしまい z-index 地獄になってしまうので程々に指定しています。
<div class="column is-12-mobile is-12-tablet is-6-desktop is-6-fullhd rellax" data-rellax-speed="-1">
  <div class="card animated fadeInUp">
    <figure class="image is-3by2">
      <img src="https://source.unsplash.com/random/512x512" alt="main image">
    </figure>
  </div>
</div>
top section は以上です
feature section & casestudy section
feature section, casestudy section 両方とも bulma の card component を使っています。
Hugo layout
layout は top section とほぼ同じです。
range first 3 としているので 3ファイル分取ってきています。
{{ with .Params.image }} <img src="{{ . }}"> {{end}} とすることで Front Matter の images のURL で画像を表示しています。
{{ range where .Site.Pages "Section" "casestudys" }}
  {{ range first 3 (.Pages.ByWeight) }}
  <div class="column animated bounce">
    <div class="card card-equal-height rellax" data-rellax-speed="0">
      <div class="card-image">
        <figure class="image is-4by3">
          {{ with .Params.image }}
            <img src="{{ . }}" alt="Features image">
          {{end}}
        </figure>
      </div>
      <div class="card-content">
        <p class="title has-text-centered">{{ .Title }}</p>
        <p class="subtitle has-text-centered">{{ .Params.subtitle }}</p>
        <div class="content">
          <p>{{ .Params.description }}</p>
        </div>
      </div>
    </div>
  </div>
  {{ end }}
{{ end }}
style
おしゃれ感増幅のために 画像を margin-top: -3.5%; のようにして少しずらしています。
意味はないです。おしゃれ感が増幅したかも定かではありません。
feature section, casestudy section は以上です
form section
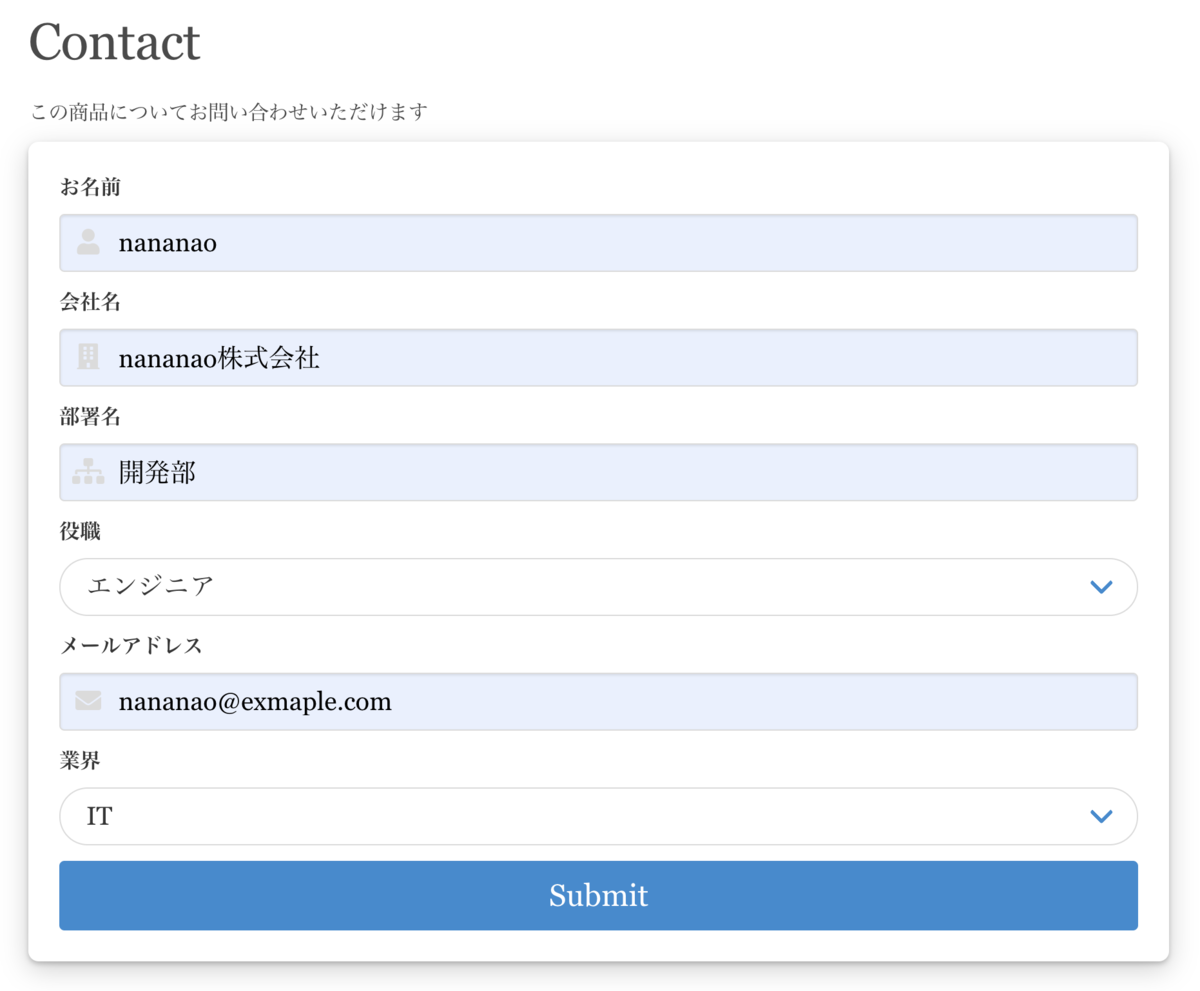
form section では netlify Forms を利用してお問い合わせフォームを作成します。
Static Site Generator の苦手とする Form をホスティング先である netlify がカバーしてくれます。
Form の作成はとても簡単で form タグに data-netlify="true" と書いて、各 input 要素にnameとして指定した文字列が netlify Forms に保存されます。
なんてマジカルなんだ。
<form name="contact" method="POST" data-netlify="true">
  <input name="name" type="text" placeholder="お名前" required>
  <select class="is-expanded" name="industry[]" required>
    <option style="display:none">
    <option>IT</option>
    <option>製造業</option>
    <option>その他</option>
  </select>
  <button type="submit">Submit</button>
</form>
例えばこんな感じで入力し submit するとします。

すると netlify の管理画面では以下のようにデータが保存されています。
一体何が起こっているんだ。

この内容は Email であったり slack への通知、webhook としての通知を出せるようなので、色々な用途に使うことができそうです。
netlify cms
非エンジニアを考慮するとやはり UI から画像、細かい文言の修正ができると嬉しいはずです。
netlify cms の config.yml は以下のようにしました。
backend:
  name: github
  repo: <YOUR REPOSITORY>
  branch: master
media_folder: "static/img"
public_folder: "public"
publish_mode: editorial_workflow
collections:
  - name: "tops"
    label: "tops"
    folder: "content/tops"
    create: true
    fields:
      - {label: "Title", name: "title", widget: "string", required: true}
      - {label: "Subtitle", name: "subtitle", widget: "string", required: true}
      - {label: "Description", name: "description", widget: "string"}
      - {label: "Image", name: "image", widget: "image"}
      - {label: "Weight", name: "weight", widget: "number", required: true}

    ~~ 省略 ~~
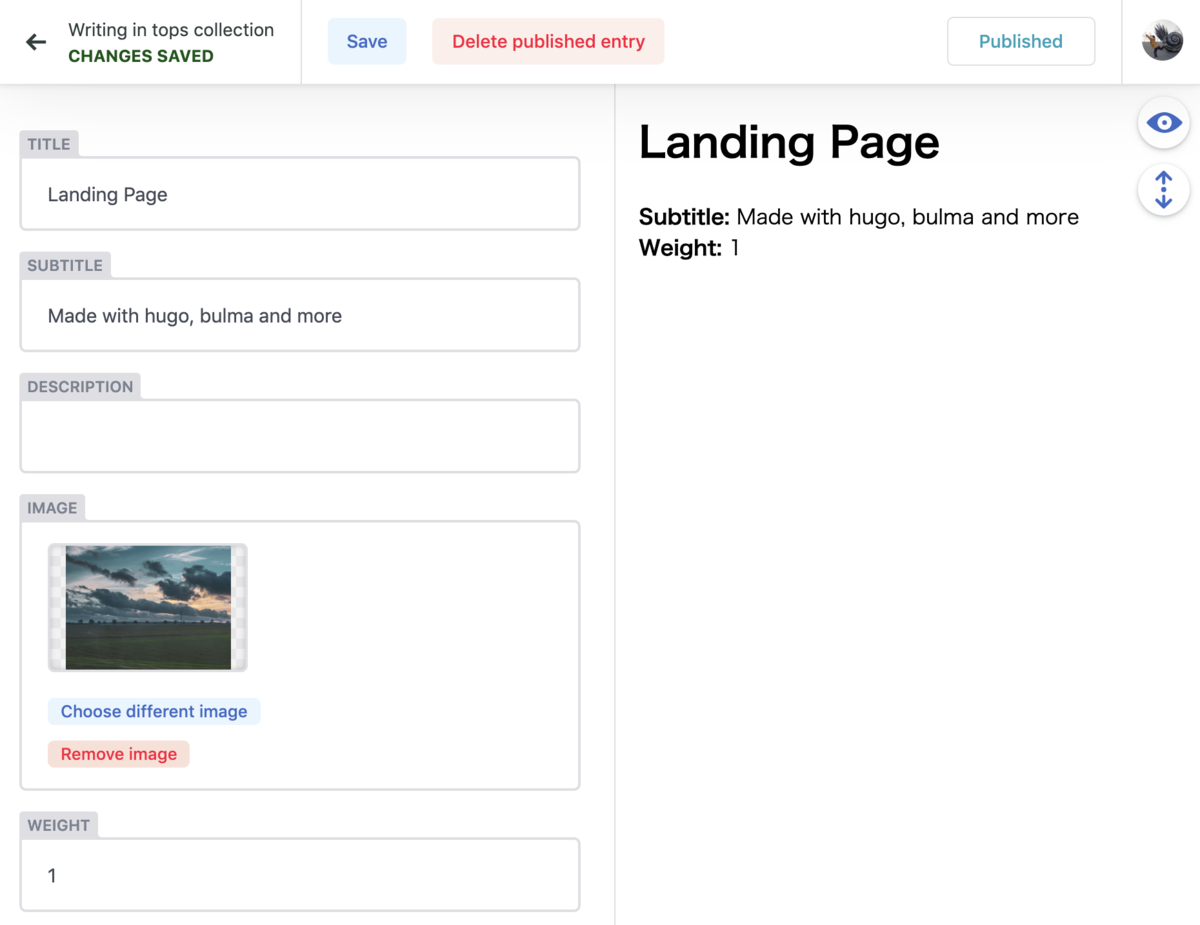
netlify cmsの画面(https:// {URL} /admin)にアクセスしGithubの認証を行ったのち top section の編集画面を開くと、指定した項目が指定した widget で編集できるようになっています。
素晴らしいの一言。。。

まとめ
Hugo & bulam & rellax & animate.css を netlify + netlify cms でホスティングしたランディングページを作成することができました。
時間を見つけてカルーセルなどを持った section を作って記事にしていきたいと思います。